

Congratulations on your purchase of the most versatile bass tremolo system in the world… the Kahler bass tremolo. Installed properly, this device will give you many years of great performance. So please read this entire installation guideline very carefully before beginning to install your new Kahler bass tremolo system...
This guideline is simply that ...a guideline. The principles in here apply to every installation of any bridge in the world. In a nutshell you will measure, locate east, west, north and south positioning of the trem, mark it out, route it out, screw it down and set it up. It's that simple. There are the tools needed for a do it yourself job. Proper installation requires some knowledge in woodworking, measurements and luthier ship. If you are unfamiliar with any of these things, PLEASE ask a luthier (guitar repairman or builder) to install it for you. Whammy Parts will NOT be held responsible for any errors resulting from the use of these guidelines. These guidelines are used for all Kahler Bass tremolos. But first a little info to get you warmed up...
All Kahler bass tremolos are flat mounting and will work perfectly with P and J bass styles. However P and J basses only make up a fraction of the different bass styles and mounting situations there are out there. Luckily with basses, most don't have a tremolo and therefore don't have any bridge routing done to the body which makes for a perfect installation every time. The flat mounting tremolo bridges are characterized by a flat chassis, which is simply screwed down flush against the body top over the route. Most basses in general need to have the tremolo or bridge countersunk into the body to achieve the right action and string angle.
As in mounting any type of tremolo or bridge, there are two key words to remember when mounting; alignment and alignment. The principles are the same for installing all bridges. The intonation length must be correct, usually 34” for most basses measured from nut edge to the smallest strings, bridge saddle witness point. Of course there are several other scales both shorter and longer but if you employ the same format (double the distance from the nut to the 12 fret), as you do with a 34" scale (17" x 2) you will get the right results. The front to back, side-to-side placement of the tremolo must also be correct. Once intonation and side-to-side alignments are made, and the tremolo or bridge mounted, where do you want your bridge saddles to be?” Food for thought....
These guidelines are written for retrofit and new construction, let's get started...
Retrofitting: If you are replacing your bass bridge with a new Kahler tremolo, you'll need to do some preparation before removing your existing bridge assembly. Complete these next 3 steps before you work on your new tremolo.
Before you start, If you are mounting a bass tremolo system, you should get a Graph-Tech Teflon nut and Sperzel bass locking tuners for the best performance.
1) Mark the old bridge spot: Place a strip of masking tape on the surface of the guitar, beneath the strings, just in front of the old (still installed) bridge. If the bridge is missing, skip way down to Step 5. Once you have an intonation line established and drawn out, come back here and continue with Step 2.
2) Mark the old bridge center point: Carefully make a centering mark on the tape between the center two strings of a 4 or 6 string bass or under the 3rd string of a 5 string bass. Make the mark with a ball point pen by holding the pen perpendicular to the surface of the guitar scribbling back and forth from string to string. Grip the pen close to the strings and keep it straight up for most accuracy. Your trying to get the exact center of the bridge area. Another cross check of this would be to take a straight edge long ruler and find the center line of the dots (see below) on the neck and line up and over the same line you drew earlier. Once this line and the previously drawn intonation line is established and intersecting, the "+" marks the installation sweet spot)...
3) Remove old bridge: Carefully remove the bridge from your bass and retract the ground wire back into the control cavity.
4) Next, remove all the hardware from the body top in preparation for routing. Hint: Knobs can be removed and posts pushed into the control cavity and the neck pickup may not need removal depending on the guitar. Essentially the body should be void of hardware and perfectly flat.
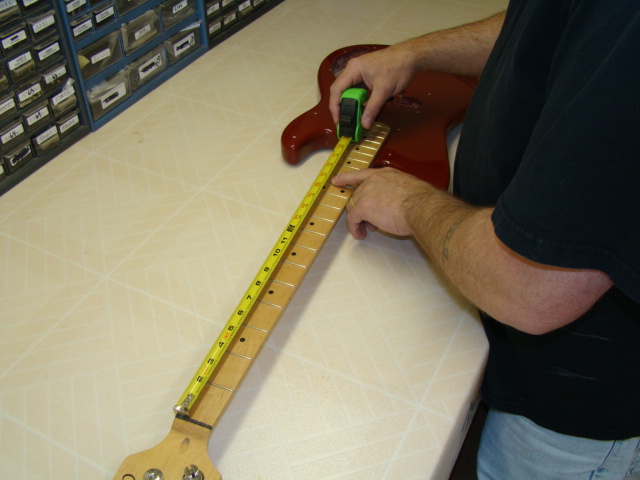
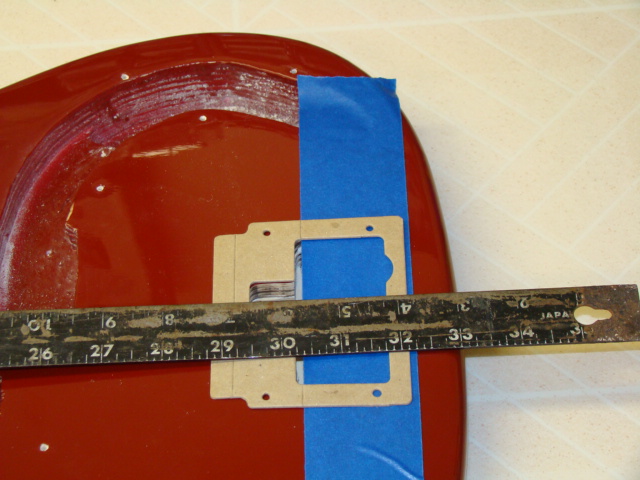
5) Marking out your intonation line on your bass: Cover the entire bridge area with blue painters tape to prevent chipping during the routing procedure. Now measure out the scale length. To do this, measure down the left side of the neck from the leading edge of the nut (facing pickups) to the leading edge of the 12th fret (the double dots), in this case it is 17".
6) Position the template: Lay the template down with the intonation marks (creases on template sides) lined up over the blue tape line. Next, measure and find the center of the template and mark it. Lay this mark inline with the center line mark you made earlier. The point where the ruler crosses the tape is the sweet spot you seek. The pre- extended forks and rollers will be lined up over this blue tape line (intonation line). And the left to right placement will be set by the center line. Think of the intersecting lines that you made on the bass top like crossroads in a city. Your at the intersection of Center St. and Intonation lane If you cross these lines and your in a bad neighborhood. The placement of the tremolo is critically dependent on these intersecting lines that is like a "+ marks the spot". Go ahead and align the template on the surface of the bass so that the centering mark you made on the masking tape, lines up with the center mark of the template. Then line up the intonation marks on the template with intonation line on the body. Forward facing saddles use the 3/8" marks and rearward facing saddles use 1-9/16" marks. Line it all up ..North, South, East and West.
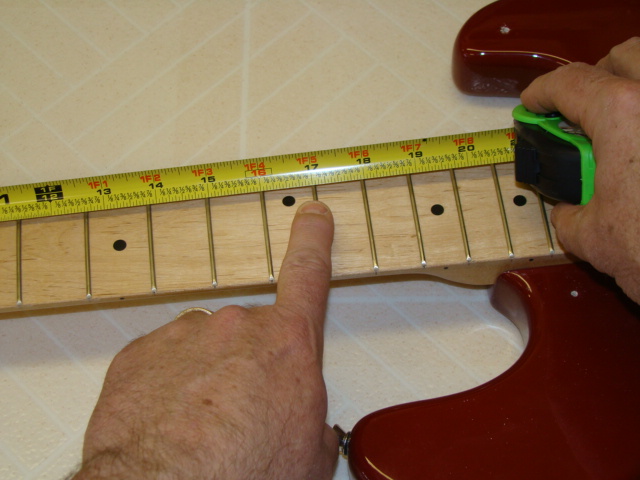
Now measure this same distance from the leading edge of the 12th fret, down to the bridge area (below, left). Make a pen mark at this point. When you double the 17" you get 34" making this a 34" scale base. Now measure 34" down the right side of the neck and make a dot. Connect the 2 dots you marked out with a length of blue painters tape over the dots to form a line. This is the intonation line.
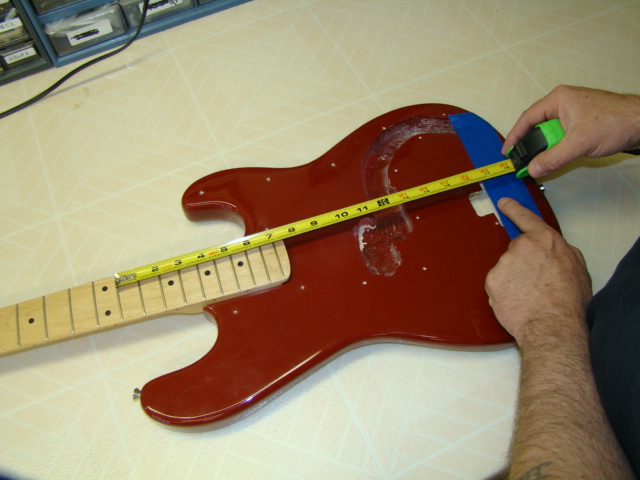
Next run a ruler down the center of the neck dots to find the bass center line. Mark it on the blue tape. cover the entire area with blur tape to prevent chipping during the routing procedure.
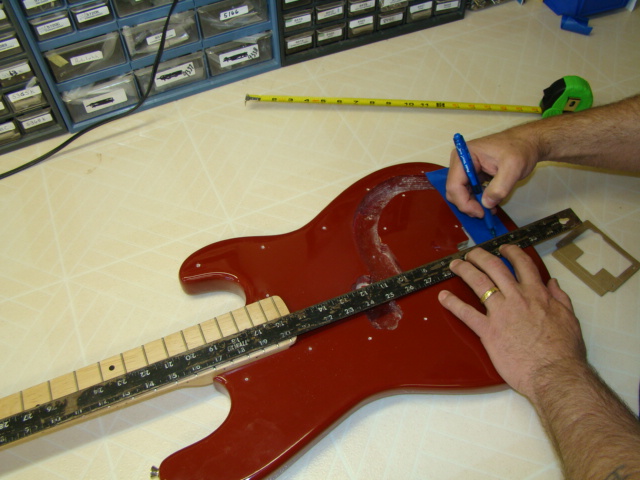
7) Route it: If you unskilled at this...get someone who is skilled to do it for you. Its tricky at first to learn it. At least practice on an old piece of wood and get some rehearsal time in. Carefully scribe the guitar surface thru the tape along the inside perimeters of the template with a sharp object.
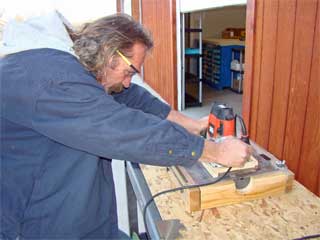
NOTE: a clean, sharp line here will help prevent the paint from chipping during the routing of the cavity. Using a 3/32” drill bit, drill 4 pilot holes 1” deep for the mounting screws according to the template. Now using a 3/8" routing bit, route down into the body top to a depth of 1", using 1/4" depth increments, taking off a little at a time. This also makes it easier to control a hand router.

Pilot drill the holes for the mounting screws and mount the tremolo. Lower all the saddle to a height of 10 o'clock...
Mounting the Tremolo for the first time...
8) The pre setup of the tremolo:
9) Slightly loosen the Phillips on top of the middle of each saddle. Pull out and measure the fork. HINT: you can measure the gap between fork body and the sandwiching plates to get this measurement. For models with forward saddles, pull out each saddle fork about 3/8" - 7/16" of of an inch and line them up equally. For models with rearward saddles pull out each saddle fork about 1/8" - 3/16" of of an inch and line them up equally, secure them by lightly re-tightening the Phillips screws
10) Now take the saddle height risers and screw them down into the fork, raising the saddles 2/3 or about 9:15 o'clock
Although your bass tremolo is adjustable for height, It is best kept around this range. The bass tremolo works best and has the most resonance and tone at this height because the string has proper pressure on the roller at all times including the slack time, during dive bombing. If you go any lower, it should be to radius your strings. Please note: You can go higher with the saddles and not hurt tone or resonance, but be careful the adjuster doesn't come out the bottom if you twist to far.
11) If needed, or for new construction, drill a ground wire tunnel between the bass tremolo cavity and the control cavity. Run the ground wire into one of front screw holes or lay it over body route edge so the mounted tremolo lays on it. Always keep the wire near the front of the route and farthest away from the swiveling CAM . Never use the spring screw to mount a ground wire.
12) Screw the tremolo or bridge into place with mounting screws supplied.
13) Intonate your bass: Proper intonation will assure that your bass plays perfectly up and down the fret board and plays in perfect tune at each fret, at least as perfect as possible since perfect intonation is physically impossible. Setting the intonation on your bridge is easy, especially if you have a Kahler CAM system. All you have to do is know a few rules of the road. The simplest test for correct intonation is to strike the harmonic at the 12th fret and then play the 12th fret. By comparing the notes, you can determine if your intonation is out of whack or if it’s right on the money. But the human ear is not perfect. You really need a visual reference.... you need an electronic tuner or to get even a more precise intonation experience, you need a strobe tuner. But strobes are expensive and shelling out several hundred bucks to intonate a few guitars is not necessary unless you’re getting into the biz. A good quality electronic tuner with a needle will do just fine. So to start….
14) Switch to the neck pickup and max out the volume.
15) Tune your bass to standard 440 tuning using an electronic guitar or bass tuner.
16) Once tuned up, lightly touch your finger on the smallest string right over the 12th fret and strike it for a harmonic sound. The tuner should read dead on zero because you just tuned it right?
17) Next, actually play the 12th fret. Don’t push hard. You don’t want to stretch the string over the fret giving you a false reading. Watch the tuning line. If the needle goes to the right of zero, the string is sharp…you need it longer. Left of zero means its flat…you want to shorten the string. Note: If the needle is erratic, lower the neck pickup volume and or the neck pickup a bit. You’re now ready to move on to the next step...
FYI: On all Kahler tremolo systems, each saddle has a fork with a roller, the fork slides back and forth through the clamp plates. Barely loosen the Phillips just enough while keeping some clamp plate tension/grip so it won’t be necessary to re-tighten between re-tunings and re-tests.
5D) If the string is sharp, or to the right of the mark, it needs to be made longer. Barely loosen the Phillips in the saddle clamp plate and push in (forward saddles) or pull out (rearward saddles) just a little bit, effectively lengthening or shortening the string. If the needle shows to the left of the zero mark, the string is flat and the string length needs to be shortened. Move the saddle fork a little toward the pickups.The idea here is to get the both open and fretted notes to be exactly the same on all 6 strings. They should match exactly at zero.
6D) Once all the strings are intonated, tighten the Phillips and double check each string for intonation. Redo them if necessary.
Maintenance of your bass tremolo...
For Kahler bass tremolos, remove, clean and replace the rollers when the don't turn freely. Never lubricate the tremolo. Keep clean and dry. Change the springs every 3-5 years as recommended, and keep the unit clean from dirt and debris. Otherwise its built like a tank and setup correctly will last a long time and give you years of maximum enjoyment and top notch performance. When installed properly, the Kahlers work incredibly well. But installation oversights can cause these systems not to perform up to par. If the tuning isn't returning to correct pitch after dive bombing, check the feel of the arm for smoothness. Does it feel like the system is dragging or catching on something as it moves? Check the tremolo cavity for obstructions. The CAM should not touch any wood when at rest. This will prevent the system from returning to pitch.
On all Kahlers, the angle of the string across the rollers should have a definite bend to it. A shallow angle can and will cause string rattle. All bass players are after the lowest action possible. Its our quest in life, next to tone... right? But players tend to drop the saddles too low in an effort to get that perfect action. This is not a good thing for sustain and tone. That's why you setup your bass around the tremolo. On the other end of the bass, the nut should be Teflon and the tuners should be locking types like Sperzel's.