

Congratulations on your purchase of the most versatile guitar tremolo bridge system in the world. Installed properly, this device will give you many years of great performance. So please read this entire installation guideline very carefully before beginning to install your new Kahler system...
This guideline is simply that ...a guideline. The principles in here apply to every installation of any bridge in the world. In a nutshell you will measure, locate east, west, north and south positioning of the trem, mark it out, route it out, screw it down and set it up. It's that simple. There are the tools needed for a do it yourself job. Proper installation requires some knowledge in woodworking, measurements and luthier ship. If you are unfamiliar with any of these things, PLEASE ask a luthier (guitar repairman or builder) to install it for you. Whammy Parts will NOT be held responsible for any errors resulting from the use of these guidelines. These guidelines are used for all Kahler CAM models. But first a little info to get you warmed up...
All Kahlers for guitar, fall into two categories: Stud mounting which is the same a saying "Tune-o-Matic mounting (below, left) or flat mounting (below, right).


All tremolos require routing. The flat mounting type is characterized by a flat square like chassis, which is screwed down flush against the body top. The guitar fixed bridge is flat mounting and the guitar tremolos come in both flat and TOM mounting. The TOM bridge mounts onto the Tune-o-Matic style studs of the stop tail piece on hard tails.
As in mounting tremolo bridges, there are two key words to remember when mounting a tremolo; alignment and alignment. The principles are the same for installing any bridge really. The intonation length must be correct, usually 25 ½” from nut edge to bridge saddles. But there are several other scales both shorter and longer. The front to back, side-to-side placement of the trem must also be correct. Once intonation and side-to-side alignments are made, and the trem mounted ...where do you want your bridge saddles be?” Food for thought....
These guidelines below are written for guitar retrofits and new construction, let's get started...
Retrofitting:
If you are replacing your old trem or bridge with a new Kahler, you'll need to do some preparation before removing your existing bridge assembly. Follow these next 5 steps before you work on your new trem.If you are mounting a stud mount system then see "mounting to a Les Paul" below.
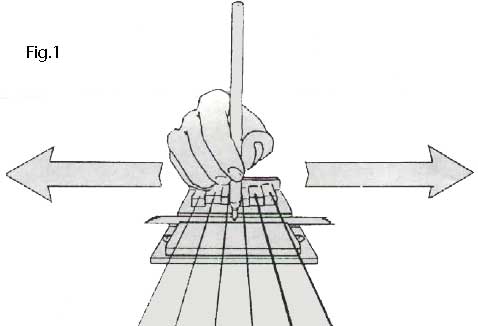
1A) Place a strip of masking tape on the surface of the guitar, beneath the strings, just in front of the bridge. 2A) Carefully make a centering mark on the tape between the center two strings (that is, 3rd and 4th strings or “d” and “g” strings). Make the mark with a ball point pen by holding the pen perpendicular to the surface of the guitar scribbling back and forth from string to string. Grip the pen close to the strings and keep it straight up for most accuracy. (see Fig 1 below).
3A) Carefully remove the bridge from your guitar and retract the ground wire back into the control cavity.
4A) Take the template #9537 and place it under the trem. Mark the mounting holes out with a pen using the trem as a guide. Punch out the marks with a sharp needle or pen and turn them into small holes.
5A) Align the template on the surface of the guitar so that the centering mark you made on the masking tape, lines up in the center of the template.
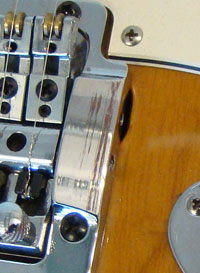
FYI: The Kahler was originally designed around the Strat. Its nose fits perfectly into the pick guard cutout. The two are like peas in a pod. The one drawback is that through the years with different models the runs are never exactly the same and therefore the slot route may extend out from underneath the body as seen it the picture to the left. This happens about 20% of the time. The slot showing in the picture below is the worst case scenario. Helpful hint: You can jockey the trem to the lower side and mount it while adjusting the saddles to the upper side to compensate. Mounting for Fender Stratocaster using a Kahler tremolo is a snap, just place the template in position using the 2 outside of the existing drilled 6 holes. When mounted on a Strat, the strings at the rollers should be 9/16” off the body. Shim neck if necessary. Skip to #8A
LES PAUL / ARCHED TOP MOUNTING...
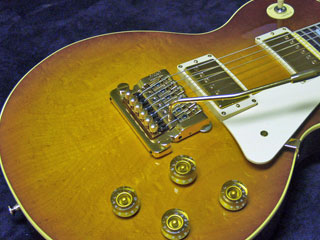
Mounting any stud mount system on a Gibson Les Paul or any arched top guitar with or without a one or two piece Tune-o-Matic type stop bar and bridge requires advanced woodworking skills.
It is highly recommended that you get a professional Luthier to install the stud mount systems, because the guitar is usually carved and not flat (easy) to route
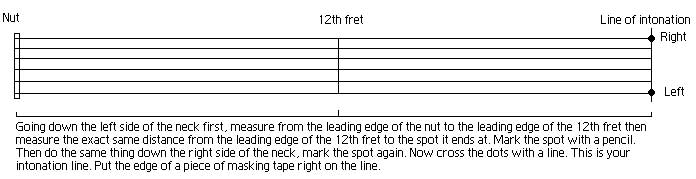
1A) To position the template #9536, measure from the nut to the 12th fret, and then measure this same distance from the 12th fret down to the body, placing the leading edge of the template at this point. Then move the template forward 1/16”. Mark out the routing cavity.
2A) We recommend a 3/8” routing bit. Route down from the top of the body 1” for the larger square of the template; route down ½” from the top of the body for the smaller square of the template. You may place small wooden blocks on either side of the routing area for the router to rest on, so that the router will skim over the hardware and electronics, and they need not be removed. Proceed to route.
3A) Place front riser inserts in the same position as the original TOM or one piece wraparound bridge mounting holes. Dowel and re drill to 5/16" if necessary. Glue tap in the bridge inserts. Next, Drill 1/2" holes for studs. Glue and tap in the stud inserts. Mount tremolo on guitar. Did you need a 1/2" and 5/16" Imperial drill bit set for the stud mount system?
4A) If the bridge is not low enough, take the risers wheels out and rest the unit on the body top. If you need to you can raise the rear to achieve a shallower angle over the roller as recommended.
5A) To mount the string lock device, see bottom of page for fitting instructions.
New Construction:
Kahler tremolos are the easiest tremolo in the world to install. Just follow these simple guidelines....
6A) Take the template and place it under the trem.
7A) Next, place the template on the body roughly where you think the bridge will sit. Do not attach it to the body yet.
8A) With the smallest allen wrench (.050) included with your Kahler, loosen the string spacing lock downs on the back of all the saddles. (see below)
FYI: All Kahler CAM systems for guitars are in the same family, whether its a 6, 7 or 8 string, all share the same parts inside the frame. The same saddles, the same string hooks, fine tuners etc. etc. ALL are exactly the same. Only the mounting plates (frames) are different. One model attaches to Tune-O-Matic (TOM) studs and the other gets screwed to the body with wood screws. Its the same with all the bass trem's and fixed bass bridges too. The bass tremolo family share its parts within that immediate bass family, even if the saddles are reversed they are still the same saddles that are on forward roller versions. Same goes for the 4,5,6,7 and 8 string fixed bass bridges. Frames are different but the parts are the same.
9A) Move the high and low E saddles to the extreme outside edges and re tighten these two only. Now you can actually see the maximum string spacing a Kahler has to offer and can better align the trem up with the neck.
10A) Slightly loosen the phillips on top of the middle of each saddle. Now pull out each saddle fork about 5/16" or 2/3rd of the way out and line them up equally, secure them by lightly re-tightening the Phillips screws (right)
11A) Now take the saddle height risers and, lower the saddles to about 9:15 o'clock or .500 (1/2" - 12.70mm). This is the best scenario for staying in tune perfectly. The higher you make the rollers, the sharper the string bend is over the roller, and thus more downward pressure on the roller pin is created which means more drag. Drag is a tremolos #1 enemy. Remember this, and you will be fine. Next... raise or recess the trem if necessary to keep this low roller height and saddle angle. The Kahler works best and has the good resonance and tone at this lower range of saddle height because the string still has proper pressure on the roller. If you go any lower, it should be for adding a radius to your strings. Please note: You can go higher with the saddles and not hurt tone or resonance, but keep in mind that more drag will be noticed. You ultimately will want to find that happy place where the action/ saddle height is nice and low, but yet enough downward string pressure is kept on the roller to keep solid contact with the strings. Its almost best to adjust the guitar to the tremolo when its configured as recommended.You are now ready for alignment measurements.
12A) First lets get the front to back (north / south) placement down ....(see and read the illustration below)
Now we need to get the side to side (east / west) alignment with the neck figured out....
13A) To do this, take the two unbent outside strings from your string pack and drop the ball end into their respective string hooks, then string them through the nut and/or lock and finally slip them through the tuners. Now turn the tuners some, just enough so the tuner grabs the strings, but yet you can still pull the strings through the tuner hole to keep the tension on them. Basically your trying to line up the strings properly down the center of the neck using the 2 outside saddles with strings, as a fret board edge reference. There no need to wind the strings allot on the tuners for this exercise.
14A) With strings lightly taught, move the Kahler from side to side until the string lies equally from either side of the fingerboard then center the trem rollers that are in line and 2/3rds of the way out, right over the intonation line you marked out earlier. Mark the spot. So between the intonation line which places the trem in the correct north/south placement, and where the east/west placement ends up, is where the trem gets mounted. "X marks the spot". With a long tipped felt pen, and being careful not to move the trem, make a dot for the 2 front mounting holes by sticking the tip of the pen through the 2 front mount holes and marking the body. Try to keep the pen straight up as possible when marking the spots. Remove the trem off the body now, de-string and set aside.
15A) Lay the 2 front screw holes of the template over the 2 front marks you just made on the body. At his point if the template seems off kilter a tad, just straighten it out... but no more than that. Now tape down the template on all four sides. Mark the rear holes out. Using a 3/32” drill bit, drill pilot holes 1” deep for all four Kahler bridge screws, according to the template.
16A) Carefully scribe the guitar surface along the inside perimeters of the template with a sharp object. (NOTE: a clean, sharp line here will prevent the paint from chipping during the routing of the cavity)
17A) Mask off the rest of the body surface area to protect it from the router, and route out the cavity to a depth of one inch. Route area with 3/8” diameter (or smaller) bit, 1” deep. If needed, or for new construction, drill a string ground hole between the Kahler cavity and the control cavity. Run ground wire into one of front screw holes.
18A) Screw the tremolo or bridge into place with mounting screws supplied. Mounting an "after the nut" String lock...
1B) Place the Kahler string lock on the head stock behind the nut. To work at its best, the Kahler string lock must be positioned as close as possible to the original nut, but be at enough of an angle below the nut so the strings are pulled down snugly into the nut slots. It must also be as close as possible to the original nut to minimize string slack when the string tension is reduced via the arm. The original nut will now serve primarily as a string guide for the string lock. Align the string lock. behind the original nut so that each of the three clamps is fairly well centered with the E and A, D and G, and B and E pairs of string slots. Sight through the string slots and move the string lock. until the top sides of the clamps fall just below your line of vision. Using the string lock. as a guide, drill four pilot holes using a 5/64” bit. Screw down the nut using the provided screws and a tiny phillips screwdriver to prevent damage to the heads of the screws. The procedures for installing the Pro string lock. are pretty much the same. To drill the pilot holes you will have to remove the finger-locking clamps. Just unscrew the retaining rod and pull it out. The clamps will fall off. Drill the holes and mount the chassis on the head stock and reassemble. The Pro string lock. requires only finger tightening of the screws and then snapping of the clamps to lock it. No wrenches are used.
2B) Certain neck styles will most likely require a shim or spacer under the string lock to provide the right string angle from the nut to string lock and ensuring correct operation. Overall best string lock position is as close to the nut as possible and with a slight string angle from nut down to string lock.On guitars with a truss rod cover such as a picture/LP bell cover (below), mount string lock directly on head stock and trim off end of truss rod bell cover to butt up to string lock.

3B) String up your guitar.
Set up adjustments...

Learn what a versatile tremolo is all about. Do you know what these adjusters do? From top to bottom...
1) Lock for fixed bridge. Turn this Allen screw to lock the tremolo and go from free floating to fixed bridge.
2) Fine tuners for fine tuning adjustments after your strings are locked down at the neck.
3) Top loading string hooks with a .60 slot for strings up to size .46 (.90 slots for strings .48 - .60 are available)
4) The CAM . This is where the depth of your tone comes from! The arm screws into it and you push down or pull up on the arm to actuate the CAM movement.
5) Arm clutch is used to control the arm swing. The arm stays where you leave it when its engaged. It's fully adjustable from "stay where you left it" to "let 'er swing till supper".
6) String spacing lock downs lock your saddle where you want it for desired string spacing.
7) Intonation adjustment. This unloosens the fork so you can slide it in and out for proper intonation.
8) Saddle height adjustment. Raises and lowers the saddle for adjusting the radius and action.
9) Saddle fork. Pull it out...push it in. Intonate.
10) String roller for stationary intonation during pull backs and dive bombs. You can actually do lead solos while dive bombing and stay intonated the whole time! The string roller provides the salt and pepper to the main CAM s tone. Steel gives some crispness clarity while Teflon gives your tone sustain with girth and of course the brass makes things warm and inviting.
11) The complete single saddle has 8 parts to it. Working from the bottom, up... The eye clamp (you cant see it in the picture) is slid onto the saddle rod. The fork is placed on top of the eye clamp and then another clamp plate sits on top of it all. A screw holds all 3 pieces together. A small allen sits over the rod at the end of each saddle. It locks the saddle to the rod once you determine how you want your string spacing. On the front side, The fork has a brass or steel roller on the end of it with a pin going through its axis. Just behind the roller, on the fork, there is a small allen adjuster which is used to raise or lower the saddle to achieve your desired radius and action. The fork slides in and out of the fork for intonation. once intonated the phillips is used to clamp the plates while sandwiching the fork and holding it all in place.
12) Spring tension adjuster. The most misunderstood yet versatile adjustment on any tremolo. Technically known as a "load level adjuster", it's many uses include:
#1 Use it to loosen or stiffen the feel of the arm for versatility.
#2 Use it to raise and lower the arm for playing comfort.
#3 Use it to compensate for heavier strings gauges and various drop tunings.
#4 Use it to level the CAM out for optimum palm muting.
#5 Use it to adjust the CAM locking pin alignment so you can lock and unlock fast, during the set.
#6 Use it to globally up tune or detune the strings to compensate for warm or cold weather.
String choice...
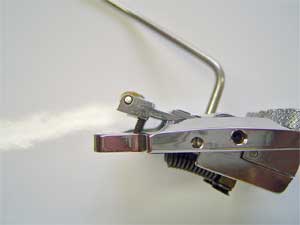
1A) String choice is a highly personal matter but with a tremolo system you are relegated to using TREMOLO REINFORCED strings. GHS Boomers, Roto Sound, and SIT Power Wound strings are a superior choice and never fail a Kahler. Using Ernie Ball strings on a Kahler is not recommended. EB's are good strings but they don't hold tune well on the Kahler CAM systems because of the G string winding and ball end. .009-.042's or .010-.046's have always been the recommended choice for a Kahler CAM system. If you use heavier strings, you will need the heavy tension springs and wider string hook #9408 to compensate. The string hook opening is only .060 on all 6 string models, for the 7th and 8th strings on 7 and 8 string models, wider slots are included. The wider slotted string hooks Part #9408 are available for your 6 string trem if your into those bass sized strings.They are good for up to .090 at the windings ( or about a .070 string) so must also take into consideration the doubled over size of the winding at the ball end. Its always almost an extra 1/2 of what the string diameter is. You always want a little play in the hook. One thing that you MUST DO is put a soft 45 degree bend in the windings of the ball end (below). This prevents the ball from spinning in the hook and reseating wrong. String hooks can break if all the rules are not followed...Bend the string as shown and do not used oversized windings.

Proper Intonation...
There is a science to the way kahler saddles act that is IMPERATIVE you understand for mounting and intonation purposes. The fact that the Kahler saddle pivots up and down and is held in place from only one end of the saddle means that there is an arc in the travel of the roller. See the picture? The saddles are at the extreme height in this example which by the way is the worse place for the saddle height to be because the string pressure binds the roller up. To continue... what happens when you drop the saddles flat? The roller comes down with the saddle BUT if you notice, the roller is also traveling in a forward arc, as you bring the saddle down....and visa versa. When you raise the saddle, the roller goes up and back in an arc. If you were adjusting the radius, at this point you would have to pull or push the fork in or out a little to keep the roller over the intonation point. This must be kept in mind as you figure out where your saddles will end up after you intonate them.
The reason you start out with the forks and risers 2/3rds out, is that you need some room to retract them, or simply put... move the saddles back during intonation.
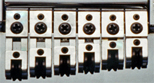
If you've noticed the high e string saddle sticks out furthest in all setups and the the rest of the saddles are retracted until the low E is retracted the most so if you had the saddles all retracted inward, then you would not be able to move them inward any further when needed. See staggered saddles pictured below. Imagine the fork is sliding back and forth in in a dramatization, do this while keeping the roller at the same height. It's impossible. The saddle will pivot in an arc even higher, because of the non moving "stilt" (saddle riser) underneath. In order for this to happen correctly and keep the same saddle height, you need the saddle riser to compensate by screwing back inside the saddle as the fork is going in. The farther back the fork gets pushed , the saddle riser needs to be screwed in farther and visa versa...get it? Both work in concert together.
To recap: Determine the mounting situation and your desired action first, then with the trem mounted in this pre-configuration mode, you'll have plenty of room to intonate and radius the strings later on.
REMEMBER: Reversed saddled bass trem's are simply the opposite.
Proper intonation will assure that your guitar plays perfectly up and down the fret board and plays in perfect tune at each fret, at least as perfect as possible since perfect intonation is physically impossible. Setting the intonation on your bridge is easy, especially if you have a Kahler CAM system. All you have to do is know a few rules of the road. The simplest test for correct intonation is to strike the harmonic at the 12th fret and then play the 12th fret. By comparing the notes, you can determine if your intonation is out of whack or if it’s right on the money. But the human ear is not perfect. You really need a visual reference.... you need an electronic tuner or to get even a more precise intonation experience, you need a strobe tuner. But strobes are expensive and shelling out several hundred bucks to intonate a few guitars is not necessary unless you’re getting into the biz. A good quality electronic tuner with a needle will do just fine. So to start….
1D) Switch to the neck pickup and max out the volume.
2D) Tune your guitar to standard 440 tuning using an electronic guitar tuner.
3D) Once tuned up, lightly touch your finger on the small E string right over the 12th fret and strike it for a harmonic sound. The tuner should read dead on zero because you just tuned it right?
4D) Next, actually play the 12th fret. Don’t push hard. You don’t want to stretch the string over the fret giving you a false reading. Watch the tuning line. If the needle goes to the right of zero, the string is sharp…you need it longer. Left of zero means its flat…you want to shorten the string. Note: If the needle is erratic, lower the neck pickup volume and or the neck pickup a bit. You’re now ready to move on to the next step... FYI: On all Kahler CAM systems, each saddle has a fork with a roller, the fork slides back and forth through the clamp plates. Barely loosen the Phillips just enough while keeping some clamp plate tension/grip so it won’t be necessary to re-tighten between re-tunings and re-tests.
5D) If the string is sharp, or to the right of the mark, it needs to be made longer. Barely loosen the Phillips in the saddle clamp plate and push the saddle back a tiny little bit, effectively lengthening the string. If the needle shows to the left of the zero mark, the string is flat and the string length needs to be shortened. Move the saddle fork a little toward the pickups.The idea here is to get the both open and fretted notes to be exactly the same on all 6 strings. They should match exactly at zero.
6D) Once all the strings are intonated, tighten the Phillips and double check each string for intonation. Redo them if necessary.
Maintenance of your Kahler CAM system...
For all series of Kahler tremolos and fixed bridges with string rollers. Keep the unit clean from dirt and debris at all times. String rollers are a big cause of out of tuning issues. They must be kept clean and free of hand gunk. The rollers must be kept low and never lube and they should whiz for a full second when you quickly spin them with your finger. Always keep thing clean and dry. More importantly you must change the springs every 3-5 years as recommended or else tuning problems arise. Stringlock's should be checked for grooving, otherwise Kahlers are built like tanks and when setup correctly will last a long time giving you years of maximum enjoyment and top notch performance. Go ahead, it ok, be a rock star!
Troubleshooting the Kahler Tremolo Systems after an install...
When installed properly, the Kahlers work quite well. But installation oversights can cause these systems not to perform up to par. If the tuning isn't returning to correct pitch after dive bombing, check the feel of the arm for smoothness. Does it feel like the system is dragging or catching on something as it moves? Check the tremolo cavity for obstructions. The CAM should not touch any wood when at rest. This will prevent the system from returning to pitch. On the Kahlers with rollers, the angle of the string across the rollers should be shallow. If too shallow of an angle it will cause string rattle. All guitar players are after the lowest action possible. Its our quest in life, next to tone... right? But players tend to drop the saddles too low in an effort to get that perfect action. This is not a good thing for sustain and tone. That's why you setup your guitar around the tremolo. On the other end of the guitar, the string lock. or locknut should be anchored securely. Drop the string tension with the arm and observe the string lock. or locknut. When you bring the strings back up to pitch, does the nut appear to move? If it rocks during this procedure, it needs to be tightened. Pull back severely... If the strings return flat, you may just need to clamp the strings tighter.
Troubleshooting tuning after the break in period...
Tuning problems usually are caused by several reasons, they are:
1) The Normal Tension Return Springs PN# 8412 are fatigued and worn out. Replace them. If you desire you can upgrade to a Heavy Tension Springs PN# 8413 for a firmer feel similar to a Floyd Rose. Also you want to check to make sure the Spring Mounting Screws PN# 8392 are snug and tight. If they slip it won't return to center.
2) If your tremolo does not return to center, then you might want to inspect the locking device on the neck to see if one or more strings are slipping through the clamp plate. The strings eventually create a worn out channel dug out of the clamp plate. If this happens it will change the tension over the entire CAM and it wont center out correctly. Inspect them and replace if necessary.
3) Is the string lock screwed tightly to the head stock? If it is not, it may shift occasionally causing general tuning problems. Try testing it by placing your thumb and index finger on the sides of the string lock extending down onto the neck or head stock. Push the vibrato bar down as far as possible then pull it up as far as possible. If the string lock is moving or shifting positions, you may be able to feel slight vibration or movement. Sometimes you can even hear a faint "click" or "chink". double check and tighten all mounting screws firmly.For deluxe string locks to function properly, tighten the screws just "finger tight" and then back off 1/4 turn. Snap shut the levers. If they do not close with slightly firm snaps, open the levers and tighten or loosen the screws slightly as needed. Repeat until the levers snap shut with a gentle push. Do not use tools to force the levers closed.
4) Are the saddle rollers rolling? If the rollers or a roller does not roll easily, the tuning of the unit can be greatly impaired because the roller will create drag on the string resulting in tuning error for that string or cause the entire unit not to balance accurately (resulting in general out of tune result). To test this, remove a string to the side of the roller and rotate the roller with your finger. Replace the string onto the roller and move the tremolo arm up and down. Does the roller appear to roll? Solution: If a roller is stuck, you need to remove the pin and clean the roller and pin with some WD40 and then rinse them with alcohol to eliminate any oil residue. See changing the string rollers video. Replace the rollers and keep clean and dry. Are the rollers too high? If the rollers are very high, they may be causing friction which is keeping the CAM from balancing properly. When a roller is very high there is more pressure from the string exerted on the roller and therefore more friction between the roller and its axle pin. This friction is often the cause of general tuning problems and is very often the cause of the specific tuning problem which is that the strings tend to stay flat when the arm is pushed down and released and the strings tend to sharp when the arm is pulled up and released. High rollers are also often the cause of string breakage because of the increased angle of bend in the string and greater contact pressure. This breakage will occur at the roller. Visually look at the rollers from the side of the guitar. Do they appear to be set high? The optimum roller height for tuning stability is about 9:15 o'clock.
5) Are the springs free from obstruction when the tremolo is in all positions? If the springs ever hit anything they can make audible noises and even cause turning problems. Solution: Deepen or widen the spring cavity to provide clearance.